Your Cart is Empty
 Free Shipping
Enjoy the convenience of free shipping on all orders. We believe in transparent pricing and delivering value straight to your doorstep. read more...
 30-Day Money-Back Guarantee
Shop with confidence knowing you have a full 30 days to try our products. If you're not completely satisfied, return your purchase for a full refund, no questions asked. read more...
 2-Year Warranty
We stand by the quality of our products with an industry-leading 2-year warranty. Enjoy peace of mind knowing your vlogging and podcasting equipment is covered against defects and issues. read more...
 Lifetime Customer Support
Our commitment to you doesn't end at purchase. With lifetime customer support, you can reach out to our expert team anytime for help, advice, or troubleshooting, ensuring you always get the best performance from your gear. read more...
A dirty lens means smudged, blurry, or occluded pictures, all of which will affect the quality of the images you take. Instead of trying to “Photoshop” out of the dust and smudges, here's how to clean a DSLR lens like a pro.
Pro Tip: While you should clean your lenses on a regular basis, do not clean it unnecessarily (definitely NOT daily) to avoid potential scratches or damages from contact.
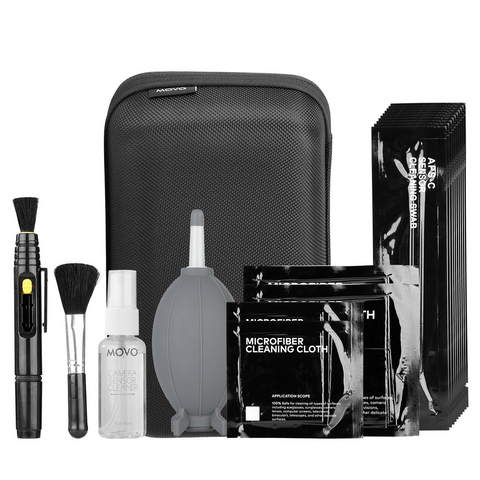
TOOLS YOU'LL NEED:
The first step to cleaning a DSLR lens is to blow off any little particles from your lenses (front and back). The air blower is the ideal tool as it avoids direct contact with the lens, and is, therefore, less likely to scratch your lens.
Hold the air blower a couple of inches away from the lens and blow a few air puffs across the lens surface.
Do this to remove any dust particles from the lens surface, as well as the rear element.

Do NOT use your mouth as the air blower as you can blow saliva and bacteria onto the lens!
Sometimes the blower may not be sufficient, and you will need a soft brush as well: gently brush the lens surface to remove dust.
Do NOT touch the brush tips before using it to avoid getting oils from your fingers to smudge the lens, which can be challenging to remove.
Dedicated Lens Cleaner (Cleaning Fluid)
Microfiber Cleaning Cloths
After removing dust from the lens, you can now use a piece of microfiber cleaning cloth to clean the lens surface and the rear element thoroughly.
Make sure to keep the microfiber cleaning cloths clean, as you will not want to use a dirty cloth on your lens. You can wash the cloth, but do NOT use a softener to avoid leaving behind a chemical residue on the fabric.

An alternative is to use disposable lens cleaning tissues.
When choosing a cleaning fluid, stick with a solution made with denatured alcohol, as detergent/water-based fluid only works with water-soluble smudges - and can potentially make certain smudges much worse. You can check the lens manufacturers’ recommendations, as they often market specially formulated cleaning solutions.
Simply apply a few drops or one spray of cleaning fluid onto the microfiber cleaning cloth – Do NOT spray or pour cleaning fluid onto the lens directly.
Then gently and steadily wipe across the lens surface and the rear side. Finally, let it air dry.
If the image still has a smudged spot, you may need to learn how to clean your camera sensor. If you are not comfortable with doing this, please contact a professional for help.
If you want to try it yourself, you can use the following steps – but remember to be patient and careful.
To test whether you have any sensor dust, take some pictures of a blank wall or blue skies with the smallest aperture. Then look at the images on your computer (preferably in Photoshop) to see if there are any “dark spots.”

Many DSLR cameras come with an auto-clean mode. Before you turn on the auto cleaning, make sure that your camera battery is fully charged, because if it turns off in the middle of a cleaning job it may damage the sensor or shutter.
Just like we already did to the lens above, dry cleaning is step one to get rid of any tiny particles on the sensor. Again, make sure the camera battery is fully charged.
To access the sensor, you can usually find the “cleaning mode” listed under settings as “sensor cleaning” or “mirror lock.” When you turn it on, you can hear a flip sound and see the sensor exposed.
Use one hand to point the camera vertically or downward to avoid getting more dust on the sensor and use the other hand to hold the air blower and gently puff a few air bursts.
If you have to proceed to this step, make sure you purchase a specialized sensor cleaning kit and refer to the information on the manufacturer’s website about proper sensor cleaning.
You can use 99% Isopropyl Alcohol diluted with distilled water at a ratio of 50/50 to clean a DSLR lens.
No, you cannot clean your camera sensor with a Q-tip. Q-tips will leave behind lint. You will end up with a chamber full of Q-tip residue and tiny fibers.


We’re a team of creators and entrepreneurs who proudly support the content creation community through innovative, high-quality products that let you do you. From filmmakers to photographers, vloggers to podcasters, and beyond, Movo helps you share your creative voices across countless mediums and content platforms everywhere.